
Git and GitHub for DevOps Engineers: Essential Commands and Real-World Workflows
Git and GitHub for DevOps Engineers come down to one habit: every change to code, configuration or infrastructure goes through version control, so you can see who changed what, review it, and undo it if it breaks something. Git is the tool that records the changes. GitHub is the service where teams share them, review them and connect them to automation.
That matters because DevOps work is mostly text. Terraform files, Dockerfiles, Kubernetes manifests, Ansible playbooks and pipeline definitions are all files, and a CI/CD pipeline usually starts when someone pushes a commit or opens a pull request. This guide explains the concepts first, then the commands in the order you'd use them, followed by branching, reviews, recovery from mistakes and a hands-on project.
Table of Contents
▼What is Git?
Git is a distributed version control system. It stores a project's history as a series of snapshots, and every person who clones the project gets a full copy of that history. You can work, commit and look at the history without a network connection. These are the terms you'll meet in every Git conversation:
- Repository: a project folder plus its history, stored in a hidden .git directory.
- Working directory: the files you see and edit on disk.
- Staging area: a holding area where you choose which changes go into the next commit.
- Commit: a saved snapshot with a message, an author and a unique ID (a hash).
- Branch: a movable pointer to a line of commits, so you can work on a change without touching the main line.
- Remote repository: a copy of the repository hosted elsewhere, such as on GitHub, usually named origin.
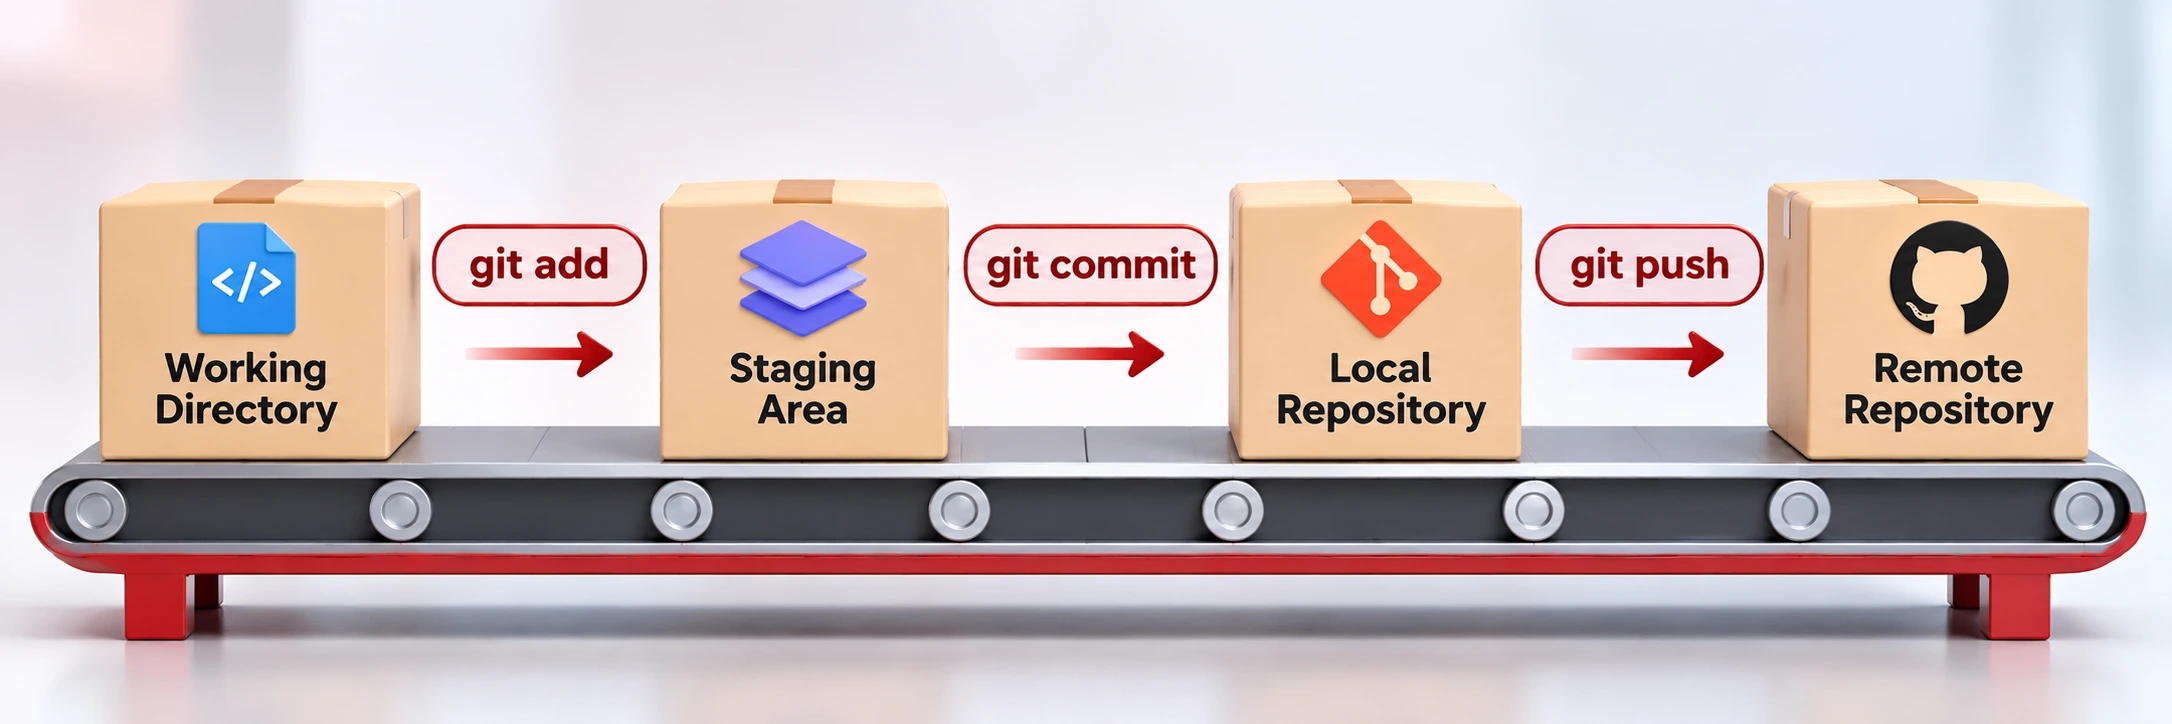
In practice: you edit files in the working directory. git add moves the changes you want into the staging area. git commit saves them as a snapshot in your local repository. git push uploads those commits to the remote repository, where teammates can see them. Splitting the steps lets you commit one logical change at a time, even when you've edited several files.

Git vs GitHub: what is the difference?
| Git | GitHub |
|---|---|
| Version control system | Cloud-based repository hosting and collaboration platform |
| Works locally | Provides remote repositories |
| Tracks file changes | Supports pull requests and code reviews |
| Supports branches and commits | Adds collaboration and repository management |
| Can work without GitHub | Commonly integrates with Git repositories |
GitLab and Bitbucket sit in the same place as GitHub: they host Git repositories and add reviews and automation. The Git commands in this guide work the same with any of them. Only the web features, such as the pull request screens, differ. If you're weighing the CI/CD tools that come with each platform, see our comparison of Jenkins, GitHub Actions and GitLab CI.
Setting up Git for the first time
Install Git from your platform. On Windows, download Git for Windows from git-scm.com. On Linux and macOS the usual package managers work:
# Debian or Ubuntu
sudo apt update && sudo apt install git

# Fedora
sudo dnf install git

# macOS with Homebrew
brew install git
Then check the installation and tell Git who you are. Git stamps every commit with this name and email. The values below are placeholders, so use your own:
git --version

git config --global user.name "Your Name"
git config --global user.email "you@example.com"

git config --list
git --version prints the installed version, and git config --list shows your settings, including the user.name and user.email lines you just set.
To connect to GitHub, create a free account and a new repository from the website. You can then talk to GitHub in two ways:
- HTTPS: the repository URL starts with https://. It works on all repositories, even behind many firewalls. GitHub has removed password authentication for Git, so you sign in with a personal access token or a credential helper such as Git Credential Manager.
- SSH: the URL looks like git@github.com:owner/repo.git. You generate a key pair, add the public key to your GitHub account and keep the private key on your machine. GitHub documents the key command as ssh-keygen -t ed25519 -C "you@example.com".
HTTPS is the simpler start, and SSH is convenient once you push often. Whichever you choose, keep tokens and private keys out of your repositories.
Essential Git commands every DevOps beginner should know
Instead of one long list, here are the commands in the order a real task needs them. The examples use one small project, devops-project, and one branch name, feature/add-monitoring, throughout.
Creating and downloading repositories
git init
git clone <repository-url>
git init turns the current folder into a new repository. git clone downloads an existing repository with its full history and sets up the remote called origin. In a DevOps team you'll mostly clone the repository that holds your team's Terraform or pipeline code.
Checking what changed
git status
git log
git log --oneline
git diff
git diff --staged
git status is the command to run most often. It shows the current branch, changed files and what's staged. git log lists commits, and --oneline keeps it to one line each. git diff shows changes you haven't staged yet, and git diff --staged shows what will go into the next commit. One catch: git diff doesn't show brand-new untracked files, so a new Dockerfile appears in git status first and in git diff --staged only after git add.
Adding and committing changes
git add .
git add <filename>
git commit -m "Add deployment configuration"
git add . stages everything that changed in the current folder, and git add <filename> stages one file. Prefer naming files when the folder contains things you don't want to commit, such as a local .env file. A good message says what the change does, for example "Add deployment configuration", because teammates read the log to understand a deployment.
Working with branches
git branch
git switch -c feature/add-monitoring
git switch main
git branch -d feature/add-monitoring
git branch lists branches and marks the current one with an asterisk. git switch -c creates a branch and moves you onto it, and git switch main moves you back. git branch -d deletes a branch that has already been merged. Git refuses if it isn't merged and tells you so, and the force option -D would delete it anyway, so use it only when you're sure the work isn't needed.
Working with remote repositories
git remote -v
git fetch
git pull
git push
git push -u origin feature/add-monitoring
git remote -v shows the URLs behind origin. git fetch downloads new commits from the remote but leaves your branch alone, so you can look first. git pull is fetch plus a merge into your current branch. git push uploads your commits. The first push of a new branch needs git push -u origin feature/add-monitoring, which creates the branch on GitHub and remembers it, so later you can type git push on its own.
Understanding Git branching strategies
Committing every change straight to the main branch is risky: one mistake reaches everyone, and nobody has reviewed it. Teams use branches so work can happen in isolation and be checked before it joins the main line. There are several common patterns, and none of them is right for every team, so treat these as options.
Feature branch workflow
- Create a branch from main, such as feature/add-monitoring.
- Make your changes and commit them.
- Push the branch to GitHub.
- Open a pull request.
- After review and passing checks, merge it into main.
This is the simplest pattern to learn, and it's a good default while you're getting started.
Trunk-based development
Developers integrate into one shared branch, the trunk, very often. Depending on the team, work happens in short-lived branches or directly on the trunk. It leans on automated tests, so a bad change is caught quickly, and on feature flags, so unfinished work can be merged without being switched on.
GitFlow
GitFlow uses several long-lived branches: main for released code, develop for integration, feature branches for new work, release branches to prepare a version and hotfix branches for urgent fixes to production. It can suit software with scheduled releases and several supported versions. For a team that deploys continuously it often adds ceremony and merge overhead, so some teams choose something lighter.
Git merge vs Git rebase
Both commands bring work from one branch into another. They differ in the history they leave behind. Suppose main and feature/add-monitoring have both gained commits since they split. The outputs below come from two small test repositories, so the commit IDs and counts differ.
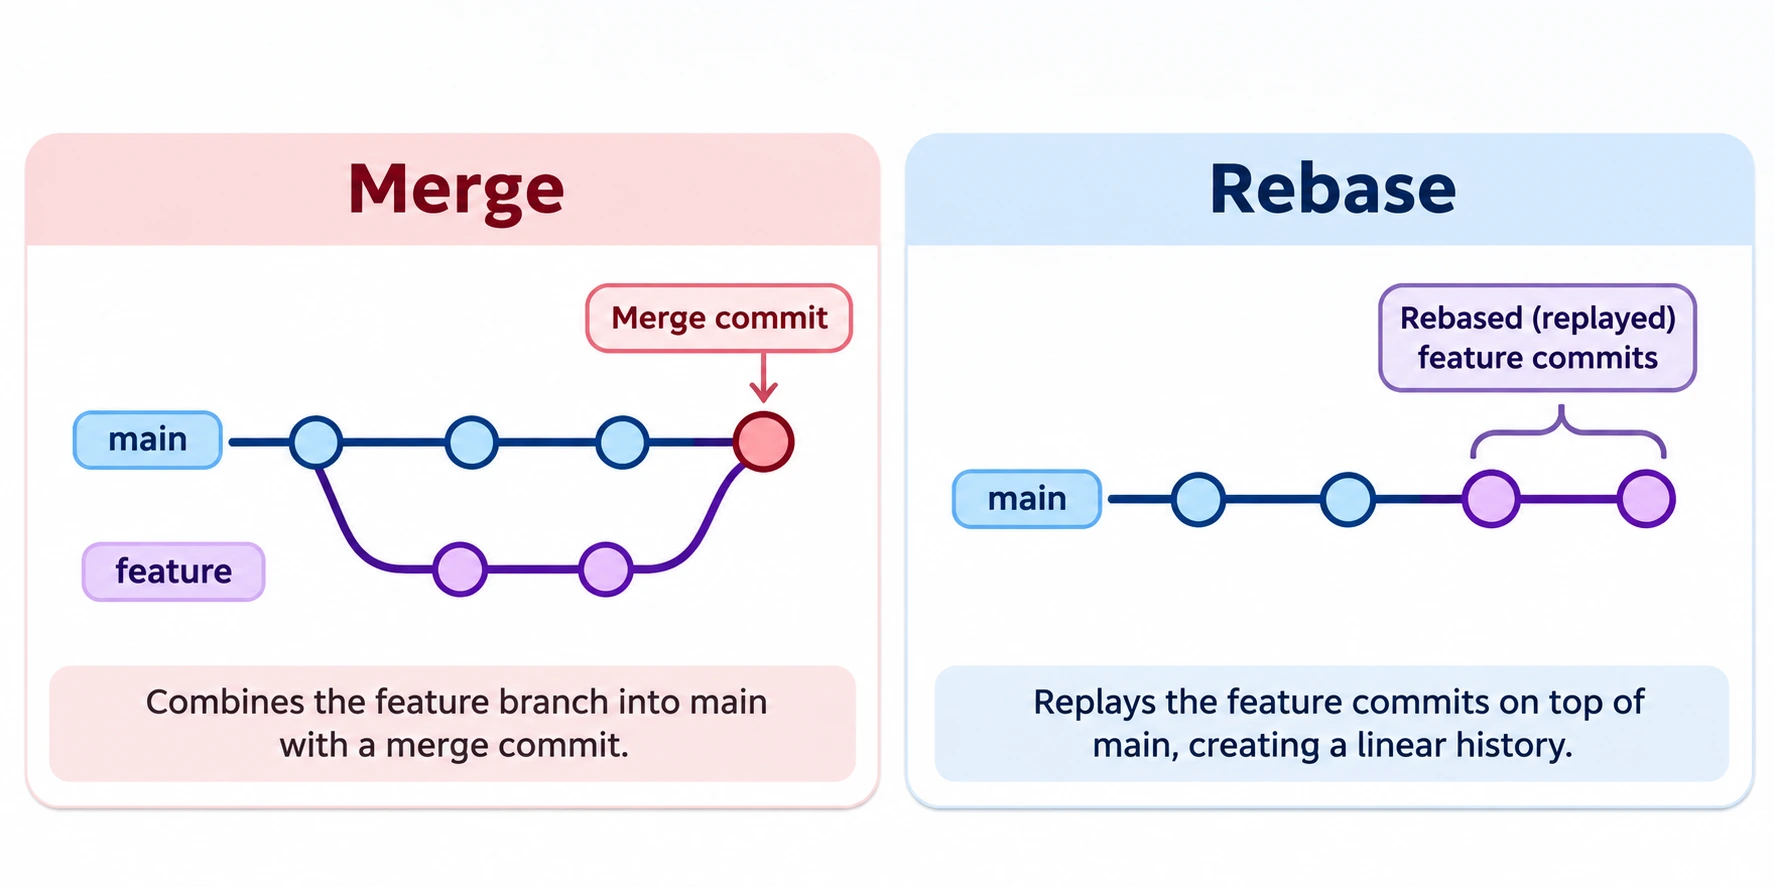
A merge creates a new merge commit that has both lines as parents, so the history shows what actually happened:
git switch main
git merge feature/add-monitoring
* 449ff63 Merge feature/add-monitoring
|\
| * dcc7557 Add monitoring config
* | b10d35d Update app
|/
* 3d02350 Add appA rebase takes your branch's commits and replays them on top of the target branch, giving a straight line:
git switch feature/add-monitoring
git rebase main
* 4d2faf8 Add monitoring config
* 6b0385c Add deployment configuration
* 0d3ee10 Add usage section
* 8fe1b90 Add READMENotice that the replayed commits got new IDs. Rebase rewrites history on your local branch. The Pro Git book states the rule plainly: do not rebase commits that exist outside your repository and that people may have based work on. If you rebase a branch you've already pushed, your normal push is rejected, because the remote has the old commits, and the usual way around that is a force push, which can overwrite teammates' work. Don't treat force pushing as routine.
Use merge when you want the real history, or for shared branches. Use rebase to tidy your own unpushed work so it sits cleanly on the latest main. Both end with the same files; only the history differs. Teams keep history readable through habits such as small commits, clear messages and a rule for how pull requests are merged. Which approach is right depends on your team's workflow, so follow your team's convention.
GitHub pull requests and code reviews
A pull request is GitHub's way of proposing a change and discussing it before it merges. On GitHub it shows the conversation, the commits, the files changed and the results of automated checks, and you can open one as a draft while the work is unfinished. A typical flow:
- Clone the repository.
- Create a feature branch.
- Make your changes.
- Commit and push the branch.
- Open a pull request against main.
- Reviewers read the diff and leave comments.
- You address the feedback with more commits.
- Once approved and the checks pass, merge the pull request.
A good pull request description says what changed, why, how you tested it and anything reviewers should look at closely. For infrastructure changes, paste the plan output or link to the test run. Reviewers can approve, request changes or comment. Resolve each conversation by changing the code or replying with the reason you didn't.
GitHub offers three ways to merge a pull request. A merge commit keeps every commit and adds a merge point. Squash and merge combines all the commits into one on the base branch. Rebase and merge adds each commit onto the base branch without a merge commit, for a linear history. Pick the one your team has agreed on.
Teams protect the main branch so these steps can't be skipped. GitHub's branch protection rules can require approving reviews, passing status checks, resolved conversations, signed commits and a linear history, and they can block force pushes and deletions. Rulesets are a newer way to do this: they are named lists of rules for branches and tags, several can apply at once and the most restrictive wins. Which features you get depends on your plan and repository settings, so check GitHub's documentation for yours.
Important Git commands for real-world DevOps work
git stash: set work aside temporarily
git stash
git stash list
git stash pop
git stash apply
Say you're halfway through editing deploy.yml when an urgent fix comes in. git stash saves your uncommitted changes and gives you a clean working directory. git stash list shows saved stashes. git stash pop brings the changes back and removes the stash, while git stash apply brings them back and keeps the stash. If you run apply and then pop, the second can fail because the changes are already in your files.
git cherry-pick: copy one commit to another branch
git cherry-pick <commit-hash>Use it when one fix from main must also go onto a release or hotfix branch without bringing the rest of main with it. Git applies that commit's changes as a new commit with a new ID.
git reset vs git revert
git reset --soft HEAD~1
git reset --mixed HEAD~1
git reset --hard HEAD~1
git revert <commit-hash>git reset moves your branch back to an earlier commit, and the flag decides what happens to the changes. These commands change local history:
- --soft keeps the undone changes staged, ready to commit again.
- --mixed (the default) keeps them in your files but unstaged.
- --hard discards them, including staged changes. Destructive command: it throws away uncommitted work.
git reset --hard can discard local work
In testing, git reset --hard HEAD~1 removed a staged file that hadn't been committed, and nothing in the output warned about it. Check git status first, and don't use it on commits you've already pushed to a shared branch.
git revert is different: it adds a new commit that reverses an earlier one and leaves history intact. The log afterwards shows the original commit and the revert commit. Because it doesn't rewrite anything, revert is the safer way to undo a change that's already on a shared branch.
git log and git diff: investigate what changed
git log --oneline --graph --all
git diff
git diff HEAD~1
When a deployment breaks, these show what changed and when. git log --oneline --graph --all draws all branches as a graph. git diff HEAD~1 compares your working files with the commit before the latest one, which helps you spot an unexpected change.
Common Git mistakes and how to recover
You committed the wrong file
First inspect the commit to see what went in, then fix it if it hasn't been pushed. If notes.txt slipped into the last commit, you can remove it from the commit and keep the file on disk:
git show --stat --oneline HEAD
git rm --cached notes.txt
git commit --amend --no-edit
--amend rewrites the last commit, so only use it before pushing. If teammates already have the commit, don't rewrite it. Add a new commit that removes the file, or use git revert.
Merge conflicts
A conflict happens when two branches change the same lines, and Git can't choose between them. The merge stops, and git status lists the files marked as both modified. Open the file and you'll see markers:
line1
<<<<<<< HEAD
replicas: 3
=======
replicas: 4
>>>>>>> feature/scale
The part above ======= is your current branch and the part below is the incoming branch. Edit the file so it holds the result you want and delete the marker lines. Then mark it resolved and finish:
git status
git add <resolved-file>
git commit
The last command depends on what you were doing. After a merge, git commit completes it. During a rebase you'd continue the rebase instead, and git status tells you which. If you'd rather start over, git merge --abort cancels an unfinished merge.
Undoing a pushed commit
Once a commit is on a shared branch, other people may have built on it. git revert <commit-hash> is generally safer because it adds a new commit and leaves history alone. Rewriting shared history is possible, but it needs agreement from everyone who has the branch, and it shouldn't be your first recovery step.
You deleted or lost work
git reflog shows where your local branch tips and HEAD have been, which can help after a bad reset:
git reflog751df6b HEAD@{0}: revert: Revert "Fix typo"
d9059f3 HEAD@{1}: reset: moving to HEAD~1
ff7f0fe HEAD@{2}: commit: Add aFind the entry from before the mistake, then check out or branch from that commit ID to get the work back. The reflog is local and entries expire, by default after 90 days if they're still reachable and 30 days if not. It can only help with work that was committed at some point. It can't bring back changes that were never committed.
You committed a password, key or token
- Revoke or rotate the credential immediately. GitHub says you need to revoke or rotate an exposed secret, and that removing it from history is often unnecessary once the credential is revoked.
- Remove it from the working tree and the codebase, and load it from a secret store or an environment variable instead.
- Understand that deleting the file in a later commit doesn't erase it from history. In a test repository, git show HEAD~1:.env still printed the old value after .env was untracked.
- If you also decide to rewrite history, coordinate with everyone who has cloned the repository. GitHub notes this can't remove the data from others' clones or from forks, and it changes commit hashes.
- Look at GitHub's secret scanning and push protection. They can alert on exposed secrets and block pushes that contain them, but availability depends on repository type and plan.
Rotating comes first, since rewriting history alone leaves a leaked key usable. For the pipeline side of this problem, see our guide to securing a CI/CD pipeline.
Git and GitHub features DevOps engineers should understand
.gitignore
A .gitignore file lists patterns Git should leave untracked. Generated files, environment files and local credentials usually belong there:
.env
*.log
node_modules/
.terraform/
.gitignore doesn't affect files Git already tracks. If .env was committed earlier, add it to .gitignore and also run git rm --cached .env, then commit. That stops tracking the file and keeps your local copy, but the old commits still contain it, as the secrets section above explains.
Tags and releases
git tag
git tag -a v1.0.0 -m "Release version 1.0.0"
git push origin v1.0.0
A tag names a specific commit. git tag lists them, and -a creates an annotated tag, which stores a message, the tagger and a date. Tags aren't pushed with a normal git push, so push the tag by name. With a version scheme such as v1.0.0, a pipeline can build and deploy exactly what a tag points to, and your team can say "production runs v1.0.0" and find the code.
Signed commits
Anyone can set any name and email in Git, so a commit's author line proves little. Signing lets you prove a commit or tag came from you by signing it with a key. GitHub supports GPG, SSH and S/MIME signatures, and it marks a commit Verified when the signature checks out, Unverified when it can't be checked, and with no status when it isn't signed. Some organisations require verified signatures, and a repository administrator can enforce this on a protected branch. Setup differs by key type, so follow GitHub's commit signature verification documentation.
Protected branches and rulesets
Use them to enforce your team's rules automatically: required pull request reviews, required status checks, signed commits and blocking force pushes and branch deletion. Rulesets add flexibility, since several can apply together, and organisation-level rulesets depend on plan. Check what your plan and repository allow before you rely on a feature.
How Git connects to CI/CD pipelines
CI/CD tools watch your repository. The usual flow looks like this:
A developer makes a change, commits it and pushes it. A pull request is opened, and automated tests run against it. After review and merge, the pipeline builds and deploys. In GitHub Actions, workflows are YAML files in the .github/workflows folder of the repository, and they start when an event such as a push or a pull request happens. Our guide to CI/CD pipeline best practices with GitHub Actions goes through them in detail, and CI/CD basics is a good primer.
Git also gives you traceability. When a deployment goes wrong, the commit history and the pull request show who changed what and why, and a tag or commit ID tells you which version is running. Infrastructure configuration can live in Git for the same reason. GitOps takes this further by treating the repository as the source of truth for what should be deployed.
Git workflows for infrastructure and DevOps projects
Anything that defines how a system runs can be stored, reviewed and rolled back through Git:
- Terraform configuration: review the plan in the pull request before anything is applied. Our Terraform roadmap shows how to get started, and .terraform/ belongs in .gitignore.
- Dockerfiles: a base image or package change is visible in the diff.
- Kubernetes manifests: replica counts, resource limits and image tags are reviewed like code.
- Ansible playbooks: a change to a server configuration is attributable and reversible.
- CI/CD workflow files: pipeline changes go through the same review as application changes.
- Application deployment configuration: environment settings are versioned, with secrets kept out.
Infrastructure changes can cause outages, and a pull request puts a second pair of eyes on them first. If a change goes wrong, git revert gives you a clean way back. Here's an illustrative repository layout, not a universal standard:
devops-project/
├── app/
├── docker/
├── terraform/
├── kubernetes/
├── ansible/
├── .github/
│   └── workflows/
├── .gitignore
└── README.md
Conclusion
DevOps engineers use Git for application code, infrastructure configuration, automation scripts and deployment workflows, and the whole path from a local change to a reviewed, automated deployment runs through it. The quickest way to learn it is to practise in a real repository, break something on purpose and recover. Keep your branch and pull request habits tidy from day one.
Practise DevOps Skills in Kannada
If you want to build DevOps and Linux skills alongside your job, MicroDegree's e-learning platform teaches in Kannada, with AWS, Azure, Kubernetes, DevOps and Linux among the skills it covers. You can explore them in one place and choose what to learn next.
FAQs
1. Is Git necessary for DevOps engineers?▼
Yes, in practice. Pipelines, infrastructure code, containers and automation scripts are all stored and reviewed in Git, and most CI/CD pipelines start from a Git event.
2. Can I learn Git without programming experience?▼
Yes. Git works on any text files, so you can practise with a README, a config file or a script. You don't need to write code to learn branches, commits and pull requests.
3. What Git commands should a DevOps beginner learn first?▼
Start with git status, add, commit, log, diff and clone. Then learn branch and switch, push and pull, and merge. Learn stash, reset and revert once you've made your first mistake.
4. What is the difference between Git and GitHub?▼
Git is the version control tool that runs on your computer. GitHub is a hosting service for Git repositories that adds pull requests, reviews, automation and access controls.
5. Should DevOps engineers learn GitHub or GitLab?▼
Learn Git first, since the commands are the same on both. Then use the platform your team or target employers use. GitHub and GitLab each have built-in CI/CD, so concepts carry across.
6. What is the difference between merge and rebase?▼
Merge joins branches with a merge commit and keeps the history as it happened. Rebase replays your commits on another branch for a straight line and new commit IDs. Don't rebase commits other people already have.
7. What is the best branching strategy for beginners?▼
The feature branch workflow is a simple place to start: branch from main, commit, push, open a pull request and merge after review. Trunk-based development and GitFlow are other options, and the right one depends on your team.
8. How is Git used in CI/CD?▼
Git events start the pipeline. A push or pull request can trigger tests, and a merge or tag can trigger a build and deployment. The commit history also shows what was deployed and who changed it.
9. Why should secrets never be committed to GitHub?▼
Because anyone who can read the repository or its history can use the secret, and deleting it later doesn't remove it from past commits. If it happens, rotate the credential first.
10. How long does it take to learn Git and GitHub basics?▼
There's no fixed time. The core commands can be practised in a few focused sessions, but confidence comes from using them on real repositories, branches and pull requests, and recovering from mistakes.